Bootstrap Complete NavBar Example Application

Posted: September 1, 2014 | Categories: Miscellaneous
I had an idea a while back for a web application I wanted to create. I'd not worked much with Bootstrap (https://getbootstrap.com/ and wanted to have some experience with it, so I thought I'd play around with building the app I wanted using the framework.
The Bootstrap web site is pretty detailed, and I quickly found an application template I could use for my application. As I poked around, I noticed that the template allowed me to add a simple menu to my application and that worked for me. As I played around with it, I found that every single example I could find ANYWHERE for how to use the Bootstrap navbar (the menu) only showed how to create the menu, not anything about how to structure a the page sections within the application that would appear as you selected each menu item. I checked all of the Bootstrap web site, stack overflow and any other site I could find with examples, but there were none that showed a complete example of a complete Bootstrap web application that had a menu.
Yet another example of a software project where the documentation for things you don't already know how to do assume that you already know how to do it. Sigh.
Anyway, I found a post on Stack Overflow that showed the JavaScript code needed to process the menu and customized it to suit my needs. The example I found at https://stackoverflow.com/questions/19579083/bootstrap-how-to-use-navbar showed how to deal with a simple menu, but what I implemented, based on the template I was using, had two menus. I also found another Stack Overflow post that described how to set the active menu item in a Bootstrap application at https://stackoverflow.com/questions/11813498/make-twitter-bootstrap-navbar-link-active. With these two posts, I was able to cobble together what I needed.
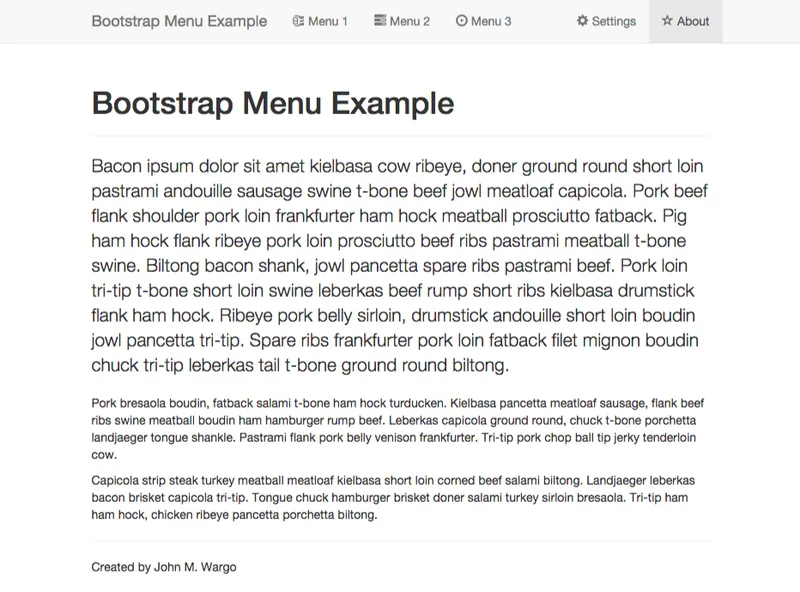
Let me show you what I created:

As you can see from the image, the navbar has two menus, one on the left (menu 1, menu 2 and menu 3) and one on the right (with settings and an about page). So my JavaScript code has to deal with setting the active menu, no matter which navbar item was selected.
Anyway, I've posted the example code to GitHub at https://github.com/johnwargo/bootstrap-navbar-complete. The web application starts with the following code:
<!-- Fixed navbar -->
 <div role="navigation">
   <div class="container">
     <div class="navbar-header">
       <button type="button" data-toggle="collapse" data-target=".navbar-collapse">
         <span class="sr-only">Toggle navigation</span>
          <span class="icon-bar"></span>
         <span class="icon-bar"></span>
         <span class="icon-bar"></span>
       </button>
       <a class="navbar-brand" href="#about">Bootstrap Menu Example</a>
     </div>

     <div class="collapse navbar-collapse">
       <ul class="nav navbar-nav">
         <li>
            <a class="menuLink" href="#menu1"><span class="glyphicon glyphicon-compressed"></span> Menu 1</a>
         </li>
         <li>
            <a class="menuLink" href="#menu2"><span class="glyphicon glyphicon-tasks"></span> Menu 2</a>
         </li>
         <li>
            <a class="menuLink" href="#menu3"><span class="glyphicon glyphicon-play-circle"></span> Menu 3</a>
         </li>
       </ul>

       <ul class="nav navbar-nav navbar-right">
         <li><a class="menuLink" href="#settings"><span class="glyphicon glyphicon-cog"></span> Settings</a>
         </li>
         <li class="active"><a href="#about"><span></span> About</a>
         </li>
       </ul>
     </div>
     <!--/.nav-collapse -->
   </div>
 </div>
It defines the two navbars and mimics most of the examples found on Stack Overflow and the Bootstrap web site.
Next you create individual pages. First of all, you define a container using the following div:
<div class="container">
</div>
Then, within the container, define separate divs for each 'page' of content:
<div class="content" id="menu1" hidden="true">
<div>
 <h1>Menu 1</h1>
</div>
<p>This is some content for the Menu 1 page.</p>'
</div>
Next you need some JavaScript code that defines an event listener for the menu.
//define the onclick event for the menu
$(".menuLink").on('click', function (e) {
//Set active menu item

//first remove active status for the currently selected
//menu item
$(this).parent().parent().find('.active').removeClass('active');
$('.nav').find('.active').removeClass('active');
//Then set the current menu item to acive
$(this).parent().addClass('active');
//Disable the link action, so nothing else happens when
//the menu is selected
e.preventDefault(); // stops link from loading
//Hide all existing page content
$('.content').hide();
//Then show the content for the current selected menu item
//get the href and use it find which div to show
$($(this).attr('href')).show();
});
The event listener first deselects the currently selected menu item then sets the current selected menu item to active. Next, in the container portion of the page, all of the divs in the container are hidden then the selected one is unhidden.
That's it,
Next Post: Poorly Designed Web Sites
Previous Post: When to Check for Updates
If this content helps you in some way, please consider buying me a coffee.
Header image: Photo by Marcos Paulo Prado on Unsplash