First Arduino Project

Posted: March 16, 2014 | Categories: Internet of Things (IoT)
My dad was a tool geek, I'm a gadget geek. All my life I've been drawn toward technology. When I was a kid, I was constantly biking to Radio Shack to pick up one of their assemble-it-yourself electronics kits. I build radios, sound generators and anything I could get my hands on. I wanted to be an Electrical Engineer, but my grades weren't good enough, so I went into Physics and Computers – go figure.
Anyway, my son's a gadget geek as well. He's 10, so all he knows is smartphones and tablets – every time I get a new device, he goes crazy for it and tries to show me how it works. Doesn't he understand that I'm in the smartphone business and will always know more than him for at least a few more years?
Anyway, I've been playing around a bit with the Raspberry Pi (I've posted several articles here about my experiences) and I've always wanted to play with some programmable microcontrollers. My neighbor got me to take a look at some microcontrollers from Texas Instruments, but I've not done anything with them yet. I'm most interested in the Arduino, but again haven't had time to play much with it...until now.
My son and I were discussing possible geek projects to work on and we decided to trick out a…well, it's a secret, but I'll write about it as soon as I can. We decided we needed a very small package for this project and I knew the Arduino was going to be too big. So I started looking around at smaller versions of the Arduino to use. The first one I found was the Teensy (https://www.pjrc.com/teensy/), its super small, and I think this is the one we'll ultimately use for our 'project.'
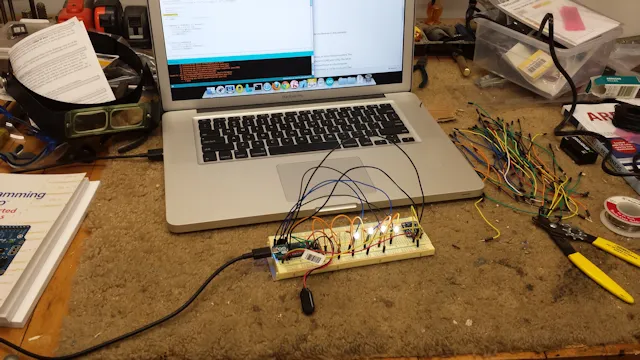
I wanted to breadboard this out first, so I picked up an Arduino Micro (https://arduino.cc/en/Main/arduinoBoardMicro) from Adafruit (https://www.adafruit.com/products/1086) – very nice, very small (although bigger than the super small Teensy). This one comes with headers (the Teensy doesn't) and fits nicely into a breadboard as you can see from the following figure.

For this particular project, the Arduino needs to know how it's oriented in space, so I picked up a Arduino Accelerometer module from Adafruit (https://www.adafruit.com/products/163). The 3g one seemed good enough, but since I bought that one the Adafruit team came up with a 16g so I picked up one of those as well. I imagine the 16g model will make it into our 'project.'
I planned on working on our project this weekend, but of course forgot to pick up a breadboard. My son and I headed off to Radio Shack (oh, the memories from when I was a kid), picked up a breadboard, battery holder and a battery and got to work.
I first installed the Arduino IDE then connected the board to the computer and tested it worked by running the blink sample application. Next I wired up a single LED and got that working. After that, I wired in 5 LEDs, showing my son how to use the breadboard and make the circuit. With 5 LEDs working, I started playing around with the application code to see if we could come up with some cool blink patterns. I did them the hard way, turning each light on and off as needed individually, so I could show my son how the code worked. He quickly got bored, so when he went off to play with his friends, I refactored the code, added arrays and loops and created some pretty tight code. Tomorrow I'm adding a Cylon pattern, it will be fun.
Next I added the headers to the accelerometer module; I wish it came with headers pre-installed because I quickly mucked up that task. Anyway, with the accelerometer wired in, the project can tell its orientation in space. Tomorrow my son and I will start programming different behavior depending on the project's orientation in space. Like I said, I'll write all about it once I get it all done.
Next Post: Comment Spam
Previous Post: Password Pain Redux
If this content helps you in some way, please consider buying me a coffee.
Header image: Photo by Robin Glauser on Unsplash.